Showing posts with label Desserts. Show all posts

Sunday, March 31, 2013

Key Lime Cheesecake

I love cheesecake. For that reason I only bake cheesecake when I am with my extended family so I am not able to eat the whole thing by myself. This weekend I made this key lime version and it was so easy and so delicious. I love the top layer of glaze that gives it that key lime pie feel. Make this cheesecake for your family...or yourself. : )

Key Lime Cheesecake

Crust

1 pkg graham crackers, crushed
1 stick butter, melted
1/4 sugar

In a medium bowl combine crushed graham crackers, butter and sugar. Press mixture into a pie pan. Set aside.

Filling

2 pkgs cream cheese, softened
1/2 c sugar
1 tsp grated lime zest
2 Tbls fresh lime juice
1/2 tsp vanilla
2 eggs

In a large bowl or stand mixer beat cream cheese, sugar, lime zest, lime juice and vanilla until smooth. Add in eggs and mix until just combined. Pour cream cheese batter into unbaked graham crust.
Bake at 350 for 40 minutes. Cool for 1 hour before topping with glaze.

Glaze Topping

1/4 c sugar
3/4 Tbls cornstarch
1/4 c water
2 Tbls lime juice
In a small sauce pan whisk all ingredients and bring to a boil over medium high heat. Boil and stir for 3 minutes. Let cool for 15-20 minutes and then pour over baked cheesecake. Refrigerate 3 + hours.

Monday, March 4, 2013

French Apple Tart

I absolutely love this recipe. It is "fancy" enough for company and with only 5 ingredients it is easy enough to make as a weeknight dessert. The pastry crust is light and flaky; the green apples are the perfect amount of tart; and the apricot preserves will make you wonder why you have never bought them before. Really this is the perfect dessert - let me know how your family likes it!

Baker's note: Parchment paper is a must for this recipe. Some butter and sugar will run off and burn black on the pan. Do not be alarmed - the tart will be fine. You will have to peel the parchment paper away at the end.


Apple tart assembled and ready for baking.

French Apple Tart

1 sheet Pepperidge Farms puff pastry (found in freezer section)
2-3 Granny Smith apples
1/2 c sugar
4 Tbls cold butter, diced small
1/3 c apricot preserves
2 Tbls water

Let puff pastry thaw out on counter about 1 hour before making. On a floured surface, roll out puff pastry so that it is roughly 10x14". Place dough on a parchment lined half sheet pan. Peel and core apples. Cut apples in half and then slice thinly. Arrange apples on dough. As you see in my picture, you will have to overlap the apples a little. Sprinkle apples with sugar and then dot with butter. Bake at 400 for 45-55 minutes. In a small bowl, mix apricot jam with water and heat in the microwave for 30-45 seconds. Spoon or brush heated apricots over cooked apples and pastry. Loosen the tart and remove parchment paper so it doesn't stick. Allow to cool and serve at room temperature.

Recipe adapted from Ina Garten's "Back to Basics"


Sunday, February 24, 2013

Chocolate Chip Cookies

Ugh, I have been in the worst food rut the past two weeks. (Hence, no blog posts.) Have you ever been in one of those? It is terrible. I would go to the grocery store with no plan and get home and feel like I had nothing to cook with. Then in an attempt to get out of my food funk, I took on recipes that were much to complicated for my blah-food-state. I made whole wheat homemade poptarts and stuffed pretzels that required both boiling and baking (and should be illegal to attempt with a whiney toddler). Finally, a batch of chocolate chip cookies pulled me out of my rut and back into the kitchen with good spirits. It happened on Friday afternoon: Vaida was napping, my house was clean, Pandora was playing my favorite country music, and it was just me in the kitchen. These cookies are easy and delicious and best enjoyed when they are warm with a glass of ice cold milk. When baking cookies I always take them out before they look done so they don't dry out.

On a side note, I have tried out several semi-healthy desserts lately: spinach brownies, whole wheat flour cookies, brownies made with coconut oil and honey, etc. Our family didn't want to eat seconds of any of these recipes and I came to the realization that dessert should be dessert. These cookies are made with Crisco, refined sugar and white flour - enjoy!

Chocolate Chip Cookies

3/4 cup Crisco shortening
1 1/4 c light brown sugar
2 Tbls milk
1 tsp vanilla
1 lg egg
1 3/4 c all purpose flour
1 tsp salt
3/4 tsp baking soda
1 c semi-sweet chocolate chips
1 c chopped walnuts (optional)

In a large bowl, cream Crisco and sugar. Add milk, vanilla and egg and mix until smooth. Stir in the remaining ingredients: flour, salt, soda, chocolate chips and nuts. Drop tablespoon size amount of batter on cookie sheet (I lined with parchment paper but you don't have to) and bake at 375 for 9-10 minutes.

Wednesday, April 7, 2010

Boston Cream Pie Cups

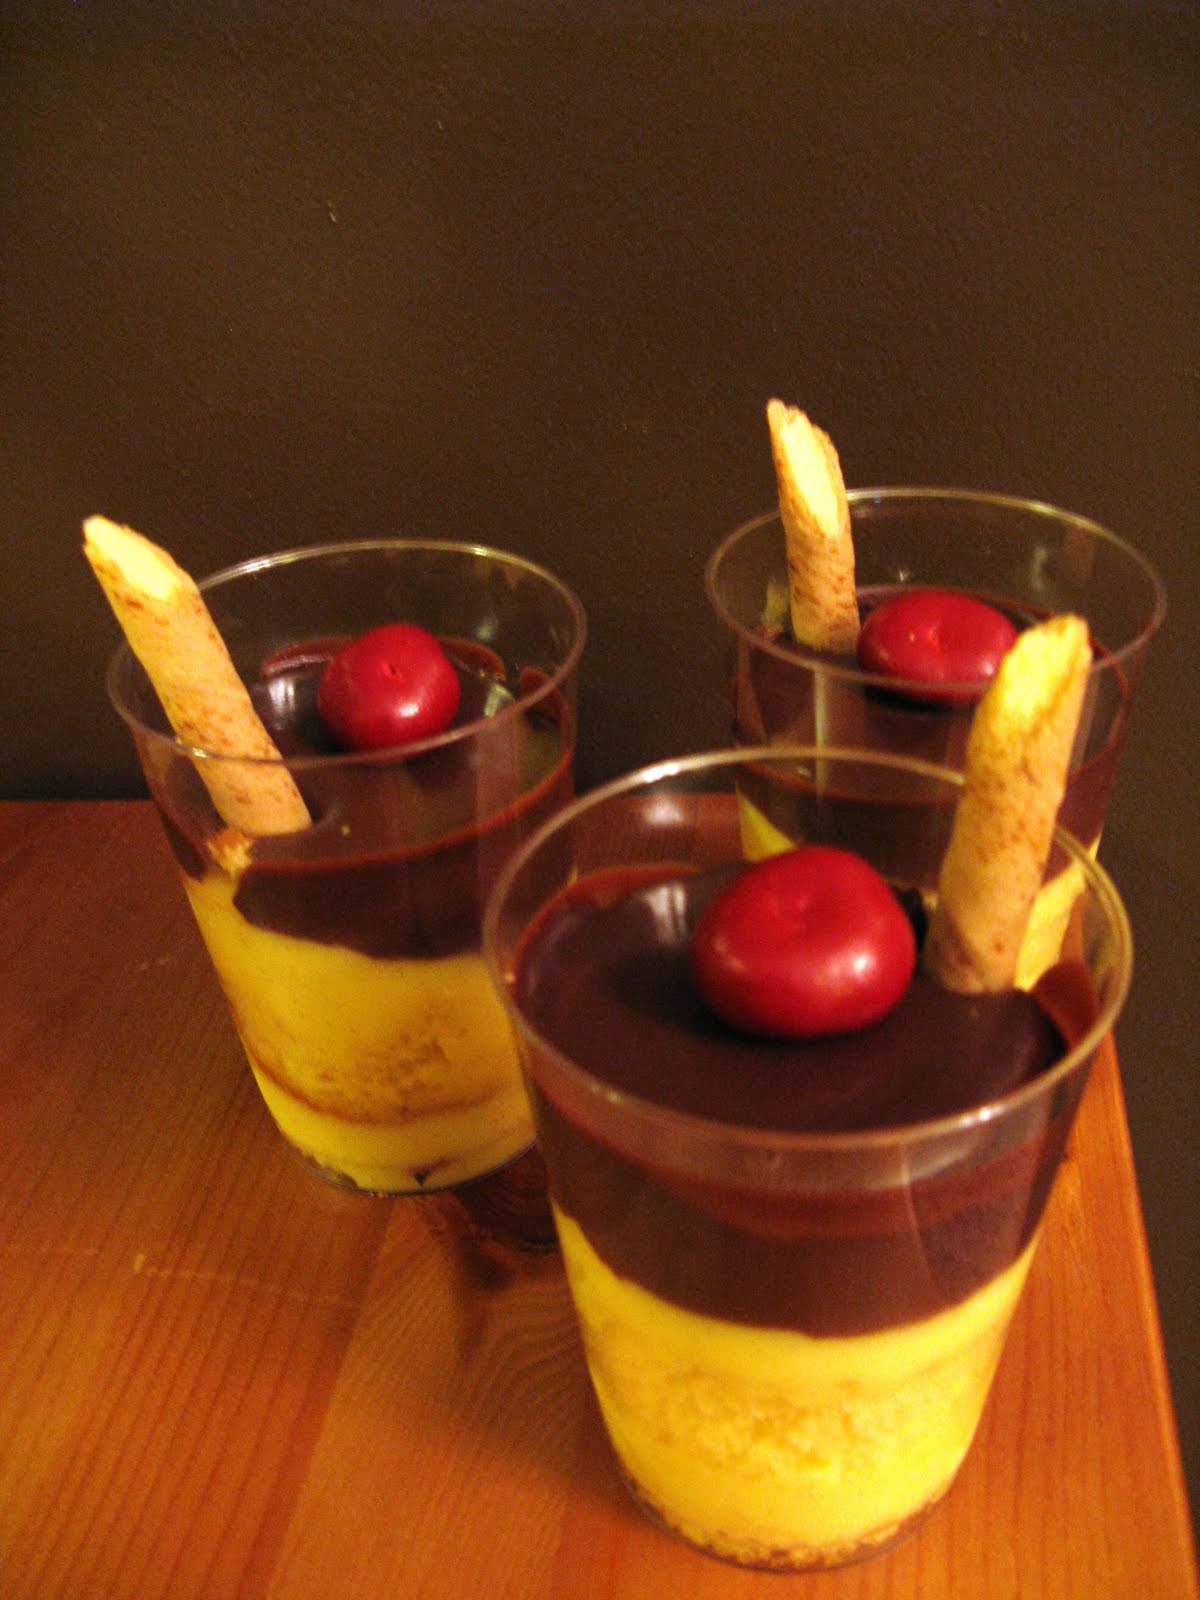
Last month we had a fun birthday dinner for my Mother-in-law Trish and Mary, my brother-in-law's girlfriend, brought the birthday cake. Trish loves Boston Cream Pie and I am so glad the Vossen family introduced me to it.  Mary made these extra-special by assembling the cake in personal serving cups. I just loved them - they are just so cute and very tasty. I had to take a picture and get the recipe to pass on to all of you.
*Note the recipe below is for a whole cake but Mary cubed the cooled cake and assembled in cups.
Cake

1 c. + 2 tablespoons of sifted cake flour
2/3 c. sugar
1 ½ teaspoons baking powder
¼ teaspoon salt
½ c. milk
¼ c. cooking oil
2 egg yolks
1 teaspoon vanilla
¼ teaspoon cream of tartar
Pastry Crème filling
2 c. whole milk
½ vanilla bean cut lengthwise seeds scraped out
6 egg yolks
2/3 c. sugar
¼ c. cornstarch
1 tablespoon unsalted butter
Ganache
8 oz. semi sweet chocolate
1 c. heavy cream boiling
Cake
Preheat oven to 350 degrees. In a medium mixing bowl combine flour, sugar, baking powder, and salt. Make a well in the center of the flour mixture. Add milk, oil, egg yolks, and vanilla. Beat with an electric mixer on low to medium speed until combined. Beat an additional 3 minutes on high speed and set aside.
In a large mixing bowl, beat egg whites and cream of tartar on medium to high speed until soft peaks form. Pour the egg yolk mixture over the egg white mixture and fold in. Gently pour the batter into a 9-inch greased pie pan. Bake for 25 to 30 minutes or until the top springs back when lightly touched. Invert the pan onto a wire rack. Cool completely.
Pastry Cream Filling
In a medium saucepan, heat the milk and vanilla bean to a boil over medium heat. Immediately turn off the heat and set aside to infuse for 10 to 15 minutes. In a bowl, whisk the egg yolks and granulated sugar until light and fluffy. Add the cornstarch and whisk vigorously until no lumps remain. Whisk in 1/4 cup of the hot milk mixture until incorporated. Whisk in the remaining hot milk mixture, reserving the empty saucepan.
Pour the mixture through a strainer back into the saucepan. Cook over medium-high heat, whisking constantly, until thickened and slowly boiling. Remove from the heat and stir in the butter. Let cool slightly. Cover with plastic wrap, lightly pressing the plastic against the surface to prevent a skin from forming. Chill at least 2 hours or until ready to serve. (The custard can be made up to 24 hours in advance. Refrigerate until 1 hour before using.)
Ganache:
In a medium bowl, pour the boiling cream over the chopped chocolate and stir until melted.
To assemble pie, remove the cake from the pan. Cut the cake in half horizontally. Place bottom layer on a serving plate or board, and spread with the pastry cream. Top with second cake layer. Pour chocolate ganache over and down the sides of the cake. Store in refrigerator.

Printable Recipe

Tuesday, April 6, 2010

Fudgy Brownies

If you need a good brownie recipe, look no further. These brownies are the best! I have to give a lot of credit to wonderful ingredients. I use a high quality dark chocolate cocoa powder with a natural high fat content. I also use my new favorite pantry staple: Vanilla Paste. You can purchase this vanilla paste at many food specialty or spice stores. It is the consistency of honey and contains the wonderful center of Madagascar vanilla beans. These brownies are moist and topped with the best frosting. I like to frost my brownies while they are warm so the frosting melts and becomes part of the brownie. Be warned, a pan of these fudgy brownies will not last long in your house!

Fudgy Brownies
1/2 c butter
1 c white sugar
2 eggs
1 tsp vanilla
1/3 c unsweetened cocoa powder
1/2 c flour
1/4 tsp salt
1/4 tsp baking powder


Frosting
3 Tbs butter, softened
3 Tbs unsweetened cocoa powder
1 Tbs honey
1 tsp vanilla
1 c powdered sugar
1 Tbs milk


Preheat oven to 350 F. Grease and flour an 8" square pan and set aside. In a medium saucepan, melt butter. Remove from heat, and stir in sugar, eggs, vanilla. Beat in cocoa, flour, salt, and baking powder. Spread batter into prepared pan. Bake at 350 F for 25 to 30 minutes. Do not overbake!


To Make Frosting: Mix all ingredients in a small bowl. Frost brownies while they are still warm.
Recipe from www.allrecipes.com
Printable Recipe

Sunday, April 4, 2010

Lemon Meringue Pie

Happy Easter!! We enjoyed a weekend of family, fun and good food in the kitchen. My sister-in-law and I made this lemon meringue pie yesterday for our Easter meal today. I suggest when you go to make this dessert, you have a friend in the kitchen to help. Since there are a few steps involved (the crust, the lemon curd and then meringue) it is nice to have an extra set of hands. (Thanks Ethan!!) The extra work is worth it when you cut your fork through the soft pillow of meringue into a burst of refreshing, sweet-yet-tart lemon filling. Yum.
Flaky Pie Crust
5 Tbs. cold butter
3 Tbs. cold Crisco
1 1/3 c. flour
1 Tbs sugar
1/4 tsp. salt
4 Tbs ice water
In a large bowl, mix flour, sugar and salt. Scatter butter and shortening over the flour and toss to coat. Using a pastry cutter, cut mixture until it forms pea size crumbles. Drizzle water over the mixture and mix until dough is evenly moist and starts to come together. On a floured work surface, form dough into a disk and refrigerate for an hour. Take chilled dough out and roll out onto a floured work surface and place in pie pan. Using a fork, pierce dough a couple of times in the pan and then bake at 400 F for 15-20 minutes or until golden brown. Set pan on a wire rack and let cool.
Lemon Curd
1 c. sugar
2 Tbs. grated lemon zest
1 1/2 c. water
1/4 c. cornstarch
1/4 tsp. salt
5 lg. egg yolks
1/2 c. lemon juice
1/4 c. unsalted butter at room temp.
In a medium sauce pan, whisk together sugar, lemon zest, water, cornstarch and salt. Bring to a boil over medium-high heat, whisking constantly and boil for 1 minute. Remove pan from heat. Whisk together egg yolks and lemon juice in a medium bowl. Add 1/2 c. of the hot cornstarch mixture to the yolk mixture and blend. Now take the yolk mixture and add it to the saucepan of cornstarch mixture and return to medium-high heat. Boil mixture for 1 minute or until thick. Remove from heat and pour filling through a strainer into a bowl and whisk in the butter. Fill the cooled pie shell with the hot filling.

Meringue
1/2 c. sugar
1 Tbs. plus 1 tsp. cornstarch
1/2 c. cold water
4 lg egg whites at room temperature
pinch of salt
In a small saucepan, whisk together the sugar, cornstarch and water and bring to a boil, stirring constantly over high heat and boil for 1 minute. Transfer mixture to a glass measuring cup (one with a spout).  Using an electric mixture, beat the egg whites on medium speed until foamy. Add salt and increase speed to medium-high and beat to form soft peaks. Pour cornstarch mixture in a fine stream while the beaters are running and continue beating until stiff peaks are formed. Top the pie filling with the meringue mixture with a rubber spatula and seal all of the filling in with the meringue. Form swirls in the meringue with a small spoon. Bake at 350 F for 15-17 minutes or until top is golden brown. Cool on a wire rack and serve.
Mom's Lemon Meringue Pie recipe from "Luscious Lemon Desserts"
Printable Recipe

Friday, March 19, 2010

Chocolate Fondue

This is less of a recipe and more of a great dessert idea for the next time you entertain. I love how simple melted chocolate and fruit can be for a wonderful dessert. If you have a fondue pot, you can take the dessert experience to a new level. I find that guests like to get involved and have fun with their food, and fondue is the perfect way for them to do this. As a host, the only work you have to do is preparing your fruit which makes for easy entertaining. If you do not have a fondue pot you can still melt chocolate in a small sauce pan and then serve immediately. Do you fondue? We do!
Dark Chocolate Fondue
2 c. good quality chocolate
1/2 c. heavy cream
1/2 vanilla bean
Set fondue pot to low setting (I have an electric pot) and add all ingredients. Stir occasionally until melted. Serve with...well anything goes! My suggestions below:
Strawberries
Pineapple
Marshmallows
Pound Cake
Brownie
Cheesecake
Pear
Banana
Apples

Sunday, February 14, 2010

Tropical Cherry Dessert

Happy Valentines Day! Ryan and I decided to celebrate a "night-in" for the holiday. We had a wonderful dinner (see tomorrow's posting) and finished it off with a delicious dessert. I wanted to make something sweet but I didn't want to spend a lot of time in the kitchen. My family calls this Dump Cake because all you have to do is dump all of the ingredients into a pan and bake. (I call it Tropical Cherry Dessert because it sounds just a little more appetizing.) This dessert reminds me of a cherry cobbler. (You can also use blueberry pie filling if you'd like.) The pineapple and cherry are sweet and tart and the coconut and pecans add the perfect amount of crunch. Enjoy Tropical Cherry Dessert with the ones you love!!
Tropical Cherry Dessert
2 - 21 oz cans cherry pie filling
1 - 20 oz can pineapple chunks, drained
1 box white cake mix
1 c. coconut flakes
1 c. finely chopped pecans
3/4 c. melted butter
Preheat oven to 350 F. Lightly grease a 9x13 pan with cooking spray. Layer ingredients in the pan in the order given. Bake for one hour. Store in the refrigerator.
Printable Recipe

Wednesday, February 10, 2010

Orange Smoothies

I am guessing many people already have the mock Orange Julius recipe but if there is just one person I reach who does not, sharing this recipe is worth the effort. (Also, maybe you have this recipe and have forgotten how great these orange smoothies really are.) We usually have these with breakfast for the holidays and we also like to have them for a night-time treat. I tried to spruce the original recipe up a bit but adding cream and orange zest. My advice to you is not to go there - the original recipe is better and easy. If you keep orange juice concentrate in your freezer than you will probably have all the items you need for a winter-pick-me-up in a glass.
Orange Smoothies
6 oz. frozen orange juice from concentrate
1/3 c. sugar
1 c. milk
1 c. cold water
1 tsp. vanilla
12-15 ice cubes
Add all ingredients to your blender and mix until smooth. (Easiest recipe I've posted thus far.)
Printable Recipe

Monday, February 8, 2010

PB Chocolate Cookie Sandwiches

When I was younger, my mom let me write notes in her cookbooks after we made something. (I always felt a little scandalous being able to write in a book.) If something turned out great, I'd write "wonderful" if something turned out bad, I'd say, "never make again!!" We'd also make notes about how many a recipe feeds or how long something takes to make. It is so fun to page through a cook book and find my ten-year old handwriting telling me never to make saltine cracker bars on Good Friday because we can't have sweets on that day and the temptation is too great. I kept this tradition going when I got married and I encourage you to start it in your family. After many years you'll have a family journal that will be worth passing on to your grandchildren. Ryan paged through a cookbook and picked out these Chocolate Peanut Butter Cookies to try. Next to the recipe I wrote "Very good! Next time make cookies a little smaller and make extra peanut butter filling."
PB Chocolate Cookie Sandwiches
(Adapted from Williams-Sonoma Cookies)
3/4 c. butter, softened
3/4 c. sugar
2 eggs
1 tsp. vanilla
1/2 c. plus 3 Tbs. flour
1/2 c. cocoa powder
1/4 tsp. baking powder
1/4 tsp. baking soda
pinch of salt
Peanut Butter Filling
4 Tbs. butter, softened
3/4 c. creamy peanut butter
3/4 c. powder sugar
1 tsp. vanilla
In a stand mixer, beat butter until fluffy. Add sugar and beat until smooth. Add eggs and vanilla and mix until blended. In a separate bowl, combine all dry ingredients. Slowly add them to the butter mixture and stir until just incorporated. Refrigerate the dough at least 2 hours! Line baking sheet with parchment paper or lightly grease.  Scoop dough in small 3/4" balls and place 2" apart on a baking sheet. Bake at 375 F for 10-11 minutes. Carefully transfer on a cooling rack and let cool. Meanwhile, prepare peanut butter filling by mixing all ingredients in a medium bowl until smooth. When cookies have cooled, spread the flat side of the cookie with peanut butter filling. Top with a second cookie and press together to make a sandwich. Store cookies in the refrigerator.
Printable Recipe

Wednesday, February 3, 2010

Saltine Cracker Bars

When I was growing up we made a batch of cookies or a pan of bars every couple of days so we always had sweets on hand to offer company. Now that I look back at it, that seems very excessive but we had a lot of visitors and my mom never had store-bought goodies on hand. These saltine cracker bars were everyone's favorite. They have a caramel sauce that can be made in a hurry and they don't require any baking. They remind me of a Twix bar with a salty crust and a chocolate-peanut butter topping. I like to store these in the refrigerator since the chocolate topping can get a little soft at room temperature. Whip up a pan of saltine cracker bars next time you have guests coming over and I promise you they will come again.
Saltine Cracker Bars
24 saltine crackers
2/3 c. sugar
1/2 c. brown sugar
1 (heaping) c. crushed graham crackers
1/4 c. milk
1/2 c. butter
2/3 c. smooth peanut butter
1/2 c. chocolate chips
1/2 c. butterscotch chips
Grease a 9x13 pan. Assemble saltine crackers along the bottom of the pan to form a crust. In a medium saucepan, combine sugars, graham crackers, milk and butter. Stir and cook over medium heat until mixture comes to a low boil. Boil for 5 minutes, stirring constantly and then remove from heat. Carefully, pour caramel sauce over saltine crackers. Let cool. In a small saucepan, melt chocolate chips, butterscotch chips and peanut butter. Spread over caramel layer and refrigerate.
Printable Recipe

Sunday, January 31, 2010

Cupcakes That Fill Themselves

Cupcakes-that-fill-themselves have become a birthday tradition in the Genereux family. I believe the recipe originated from our country church cookbook. As children, these are the cupcakes my mom would make to send to school with us on our birthday. As adults, these cupcakes are still requested for birthdays and special occasions. When we were invited to our friend's birthday party this week, I thought these cupcakes would be the perfect treat to bring.  What makes them so special is that they look like your basic chocolate cupcake, but once you bite into one, you discover a cream cheese and chocolate chip filling that resembles a burst of cheesecake. They are perfectly topped with cream cheese frosting (and a birthday candle).
Cupcakes that Fill Themselves
1 box chocolate cake mix, batter prepared as directed
1 8oz block cream cheese, softened
1 large egg
1/3 c. sugar
1 tsp. vanilla
1 c. mini chocolate chips
In a large bowl, prepare chocolate cake mix as directed on box. Set chocolate cake batter aside. In a medium size bowl, beat cream cheese, egg, sugar and vanilla until fluffy. Fold in chocolate chips. Place cupcake liners in your cupcake pan and scoop a tablespoon of the chocolate batter on the bottom of each. Next scoop a tablespoon of the cream cheese mixture on top of the chocolate layer. Finish by scooping a heaping tablespoon of the chocolate cake batter for the last layer. Bake at 350 F for 20 minutes. (Makes 24 cupcakes)
Cream Cheese Frosting
4 oz cream cheese, room temperature
1/4 c. butter, room temperature
4 c. powdered sugar
2-3 Tbs. milk
1-2 tsp. vanilla
Beat all ingredients in a large bowl until fluffy. You will have to add milk and powdered sugar as needed to achieve perfect consistency.
Printable Recipe

Monday, January 25, 2010

Chocolaty Goodness Cookies

Any time I have a dentist or doctor appointment, I spend my time in the waiting room immersed in the variety of food magazines lying around. I always bring a pen and paper because I never know when a recipe may catch my eye. These cookies are the result of this process. I couldn't tell you what food magazine they came from, but I do know that they are a Paula Deen recipe. These cookies are soft and chewy. The cream cheese helps keep them tasting fresh even a few days after baking - if, that is, they last that long in your household. You will be surprised at how rich they are for only having a few ingredients in them. Although Paula calls them "chocolate gooey butter cookies" we renamed them "chocolaty goodness" in our house because it was the first thing that came out of my mouth when I took my first bite.
Chocolaty Goodness Cookies
Paula Deen's Chocolate Gooey Butter Cookies - slightly altered
1 box dark chocolate cake mix (dry)

1 large egg
1/2 c. butter, softened
8 oz. cream cheese, softened

1 tsp. vanilla
1 c. sugar
In large bowl, beat cake mix, egg, butter, cream cheese and vanilla until well mixed. Dough will be stiff. Roll dough into balls and coat in sugar. Place chocolate balls on a sheet pan and slightly press dough down with your fingers. Bake at 350 F for 8-10 minutes. Cookies will seem very soft but will set after cooling.

Monday, January 18, 2010

Apple Dew


Apple dew is one of my favorite "quick" desserts. (The picture doesn't give it justice.) It was the first dessert that I made Ryan when we were dating and he asks for it every time he sees granny smith apples. I like to make this for guests and try to make them guess what is in it. No one has been able to guess correctly because no one would ever think that Mountain Dew is a key component. The crescent rolls are light and crisp and the apples in the center bake until they are as soft as butter. The soda makes for a warm sticky sauce that tastes wonderful over vanilla ice cream.
Apple Dew
2 granny smith apples
2 cans crescent rolls
1 1/2 sticks butter
1 3/4 c. sugar
1 c. Mountain Dew
1/4 tsp. ground cinnamon

Cut, core and peel each apple into 8 slices. Roll out crescent triangles and place an apple slice in the middle of each. Roll up crescent from the widest side of the triangle to the tip. Place each apple roll in a 9x13 baking dish. Meanwhile, in a sauce pan, melt butter and 1 1/2 cups of sugar and cinnamon over medium heat, stirring until melted. Add Mountain Dew, stir until combined and then remove from heat. Pour butter mixture over rolls and sprinkle with remaining 1/4 cup of sugar. Bake at 350 for 50 minutes.
Printable Recipe

Saturday, January 16, 2010

Very Berry Sorbet

We have only had our ice cream machine for a few weeks and we have already made 4 different ice cream creations. Although we are enjoying every bit of it, our waistlines are not so happy. Our temporary solution…homemade sorbet! This Very Berry Sorbet was divine. The strawberries bring the sweet; raspberries add the tangy; and lemons make this dessert oh-so-refreshing. When I take a bite and close my eyes (while standing next to my warm oven) I can see sunny summer days off in the distance. For a sparkling, kid-friendly cocktail, add two scoops of berry sorbet in a glass, then fill with 7-Up or Sprite.
Berry Sorbet
3/4 c. fresh strawberries, hulled and sliced
1/2 c. fresh raspberries
1 c. sugar
Juice of 2 medium lemons
1/2 tsp. lemon zest
1/4 white corn syrup
1 3/4 c. water
In a medium bowl mix berries, sugar, lemon juice and lemon zest. Cover and refrigerate 2 hours. In a blender or food processor, puree berry mixture. Add corn syrup and water and stir until blended. Pour liquid into an ice cream maker and freeze according to the machine instructions.
Note: This sorbet was the perfect after freezing for a couple of hours. After freezing for a night or two it becomes much more hard and required a longer time to thaw to be scoop-able. It was still good but lost that smooth texture that sorbet is known for.
Printable Recipe

Wednesday, January 6, 2010

Cookies & Cream Ice Cream


I received a very fun "toy" this Christmas - an electric ice cream machine!! An ice cream machine has been on my wish list for the past five years so I was delighted, to say the least. I am already dreaming about future sorbets, daiquiris, and ice cream creations that I will now be able to make. I know not everyone will have an electric ice cream maker on hand. The hand-crank style mixers also work well. My husband has great childhood memories of taking turns mixing a big bucket of ice cream. When I was a kid I was desperate to make homemade ice cream. Without a machine of any kind I had  to improvise. I poured my cream mixture into a quart size ziploc bag and then filled a gallon size ziploc bag with ice and about 1/4 c. rock salt. I placed the sealed quart bag inside the ice bag and shook the contents until a soft-serve mixture evolved. It was fun and can work in a pinch, but it was kind of a mess.  Whatever your process, enjoy the simple pleasure of making a delicious dessert out of a few basic ingredients.
Cookies & Cream Ice cream
2 c. heavy cream
1 c. skim milk
3/4 c. sugar
1 1/2 tsp. vanilla
8 Oreo cookies, crushed

In a medium bowl, wisk sugar with skim milk until sugar dissolves, about 2 minutes. Add heavy cream and vanilla. Pour into ice cream machine and let mix about 20 minutes or until thickened. Stir in crushed cookies and transfer ice cream into an air tight container. Let ripen 1-2 hours in the freezer. Enjoy!
Printable Recipe

Monday, December 21, 2009

Andes Mint Cookies


There are many Christmas cookie variations that use the lovely Andes Mint for a frosting. I like this recipe for its simplicity and that it uses chocolate chips instead of cocoa powder. These mint cookies are soft and chewy and the swirled chocolate mint makes them simply beautiful. The best part is that after making these, your kitchen will actually smell like Christmas! Once again, I am using parchment paper (one of the best inventions : ) on my cookie sheets. If you do not plan on using parchment paper you will want to lightly grease your baking sheet because these cookies have a tendency to stick.
Andes Mint Cookies
3/4 c. butter
1 1/2 c. brown sugar
2 Tbls. water
12 oz. bag semi-sweet chocolate chips
2 eggs
2 3/4 c. flour
1/2 tsp. salt
1 1/4 tsp. baking soda
1 tsp. vanilla

2 boxes Andes Mints

Melt together butter, brown sugar and water. Add chocolate chips and stir until melted. Let stand about 15 minutes to cool. Add remaining ingredients (except mints) and mix until well incorporated. Chill dough 1-2 hours. Roll into 1" balls and place on baking sheet lined with parchment paper. Bake at 350 F for 8-9 minutes. Remove from oven and place 1/2 of an Andes mint on top of each cookie. Let cookies sit for 30 seconds or until candies are melting and glossy. Swirl melted chocolate with a butter knife.
Tip: I like to use mini chocolate chip morsels since they melt so easily.

Sunday, December 20, 2009

Homemade Caramels


Good things come in small packages. Nothing could be more true when it comes to these buttery, vanilla homemade caramels. They make the perfect gift for practically everyone on your Christmas list. As a child we tested the caramel in a glass of water, waiting for a "firm ball" to form...spare yourself this hassle and buy a digital thermometer so you will know exactly when the caramels are done. My tip is to use parchment paper in your pan instead of butter. Once the caramels have cooled and set, all you'll have to do is lift the parchment paper and everything comes out in one easy step. Peel the parchment paper back and you are ready to cut and package your candies.
Homemade Caramels
1 c. butter
2 1/4 c. brown sugar
dash of salt
1 c. white Karo syrup
1 (14 oz) can sweetened condensed milk
1 tsp. vanilla

Place a large sheet of parchment paper in a 8x8 pan and set aside. Melt butter over medium to medium/high heat in a large sauce pan. Add brown sugar and salt, stir well. Slowly pour in Karo syrup and sweetened condensed milk stirring constantly. Continue to stir as mixture bubbles and reaches 245 degrees on a candy thermometer. Immediately remove from heat and add vanilla. Pour into parchment lined pan and let cool. Cut into squares and wrap in wax paper.

Saturday, December 19, 2009

Raspberry Thumbprints


There is nothing better than a Saturday afternoon devoted to the kitchen. Especially when it is the Saturday before Christmas and the excitement of the season is in the air. I don't think Raspberry Thumbprints are traditionally a Christmas cookie but I love the way the red jam livens up a Christmas platter. I like to make these cookies bite-sized and enjoy them with a good cup of coffee in the morning. Go ahead and double the batch right away because they disappear fast!
Raspberry Thumbprints
1 c. butter at room temperature
2/3 c. sugar
1 tsp. almond flavored extract
2 c. flour
1/4 c. raspberry jam
Cookie glaze 1 c. powdered sugar 1/2 tsp. almond flavored extract 4-5 tsp. water Mix above ingredients in a small bowl until smooth.

Beat butter until well blended. Add sugar and almond extract and beat until creamy. Stir in flour (dough will be slightly crumbly) and shape into small 1" balls. Place on baking sheet lined with parchment paper and make a shallow indent with your finger or the end of a wooden spoon. Fill each cookie with 1/4 tsp. raspberry jam. Bake at 350 F for 14-16 minutes. Let rest about 5 minutes and then drizzle with glaze.
Tip: I scoop the jam with my 1/4 tsp and then using a butter knife, empty the jam into the indent.

Wednesday, December 16, 2009

Chocolate Peanut Butter Crisps


This was my favorite Christmas treat as a kid. (I'm sure this had a lot to do with the fact that they were so easy to assemble that my mom let me make them by myself!) These chocolate peanut butter crisps are easy enough for kids yet sophisticated enough to share at an office Christmas party. I like that you can make these days ahead of time and they keep well in the refrigerator. The best part of these candies is that you probably have all of the ingredients in your pantry to make them tonight!
Chocolate Peanut Butter Crisps
1 box Wheat Thins crackers
1 1/2 c. creamy peanut butter
6 oz. chocolate flavored almond bark
1/2 c. semi sweet chocolate chips

Spread each cracker with peanut butter and place another cracker on top to make a small "sandwich". Melt chocolates in a double boiler and dip prepared crackers until well coated. Place on a baking sheet lined with wax paper and let cool.